Use General > Print to print active design using current settings.

Use General > Print Preview to preview a design before printing.
|
|
Use General > Print to print active design using current settings. |
|
|
Use General > Print Preview to preview a design before printing. |
Print options give you precise control over your design printout. Different worksheet configurations are available for different purposes – design worksheet, color sequence, appliqué pattern, as well as hooping sequence. Each configuration can be further customized.
Optionally, print the whole design or selected objects only. If the latter, select the objects before accessing the Print Options dialog.
Select File > Print.
Click the Print icon or the Print Preview icon. Both dialogs provide an Options button.
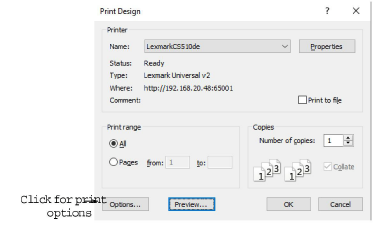
Click Options to further configure print options.
The default worksheet type is the ‘design worksheet’.
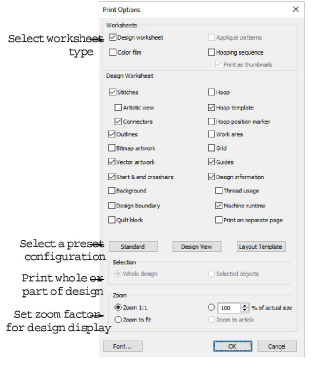
Select a worksheet type:
|
Type |
Purpose |
|
Design worksheet |
Print all production-related information, such as bobbin length, design size, garment fabric, etc, is provided. |
|
Appliqué patterns |
Print appliqué patterns – cutter information – isolated from the design. These can be used as a guide to cutting out fabric pieces. |
|
Color film |
Print a list of colors and objects used in the design, together with stitch information for each color layer. |
|
Hooping sequence |
If there is more than one hooping in the design, this option displays hoopings in their correct sequence. |
If you have selected ‘design worksheet’, three presets are available:
|
Preset |
Purpose |
|
Standard |
Reset worksheet options to default values. |
|
Current view |
Display the design as it appears in the workspace. |
|
Layout template |
Show the design at actual size (1:1) with object outlines only (no stitches). |
Further configure design worksheet options as necessary:

Options include:
|
Option |
Purpose |
|
Stitches |
Display design as stitches with or without Artistic View. In stitch view, connectors may also be shown. Use them as a guide when you save to multiple files for multi-hooped positioning. |
|
Outlines |
In stitch view, outlines helps delineate shapes. Alternatively, turn off stitches and print outlines alone. |
|
Artwork |
Choose to include bitmap or vector artwork in the printout. |
|
Start & end crosshairs |
The start/end needle position is included in the printout. |
|
Background |
Include design background if set – for instance, to indicate fabric appearance or position on garment. |
|
Design boundary |
Display design bounding rectangle and reference marks similar to the machine display. This means start and end point positions can be easily identified. When designs are located on a large work piece, like a table cloth, design extents and geometric center become important for positioning. |
|
Quilt block |
|
|
Hoop |
It may be important to include the hoop in the printout for positioning purposes. Alternatively, use the hoop position marker to align the needle and orientate the hoop. |
|
Hoop template |
Printing the hoop template allows you to cut out the printed design and align it within the hoop. Use the template markings to align it to physical hoop template. |
|
Hoop position marker |
This indicates the hoop center and orientation for more accurate hoopings. |
|
Work area |
This lets you arrange multi-hoopings on an item or fabric to be sewn. It should be printed together with hoop position markers. |
|
Grid / guides |
These may be used to help align the hoop template lines. |
Optionally, tick Design Information to include production information in the printout:
|
Information |
Purpose |
|
Thread usage |
Helps you determine length of threads required and assemble prior to production. Thread usage appears below the color sequence list. |
|
Machine runtime |
Estimated machine runtime based on current machine type. |
|
Print on separate page |
Print all design information on a separate page for easy reference. For instance, a multi-hooped design may include many color changes, requiring a dedicated page to display. |
Optionally, print the whole design or selected objects only. Only enabled if there is already a selection in the workspace.

Select a sizing option to view the design on the worksheet:
|
Type |
Purpose |
|
Zoom 1:1 |
Choose this (the default) if you want to see the design in real size. |
|
Zoom to fit |
Use this if you want to see the design using all the available space on the worksheet. |
|
% of actual size |
Use this if you want a larger printout at a known relative size – e.g. twice the original (200%). |
|
Zoom to article |
Use this if you want to visualize design placement on an actual article or garment. |
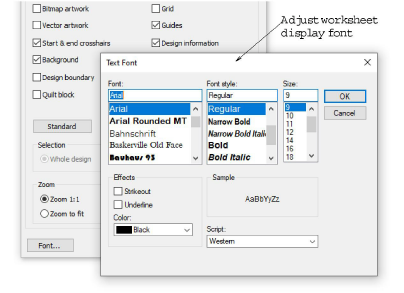
Optionally, click the Font button to adjust worksheet display font.