
Click View > Keep Hoop Position to keep the hoop in position when placing the design. When toggled off (the default), the hoop is automatically centered around the design.
|
Click View > Keep Hoop Position to keep the hoop in position when placing the design. When toggled off (the default), the hoop is automatically centered around the design. |
Before stitching, some embroidery machines require you to position the starting needle exactly above the first needle penetration point. Use Auto Start and End to set the positions of first and last stitches in your design.
1 Select Design > Auto Start and End.
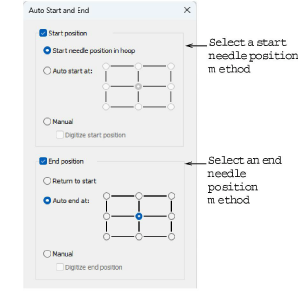
2 Select a Start position method:
Method |
Notes |
Start position |
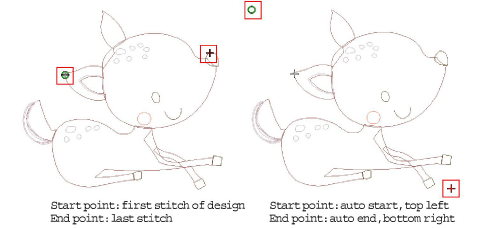
Deactivating this toggle sets the start point to the first stitch in the design. |
Start needle position in hoop |
The start point is set to the hoop center.
|
Auto start at |
The start point is set to a specified point in the design. Choose from the available options – top-left, center, bottom-right, etc. |
Manual |
The start point defaults to the last selected position. |
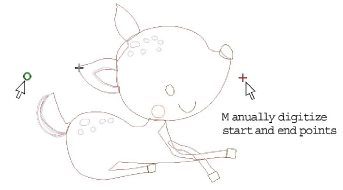
Digitize start needle position |
You are prompted to mark the start point. |
3 Select an End position method. Similar options apply.
Method |
Notes |
End position |
Deactivating this toggle sets the end point to the last stitch in the design. |
Return to start |
The end point is set to whichever start point was selected. |
Auto end at |
The end point is set to the specified point in the design. |
Manual |
The end point defaults to the last selected position. |
Digitize end position |
You are prompted to mark the end point. |
4 Click OK. Connecting stitches will be inserted as required before the first and after the last stitches of the design.
Note: If you choose to digitize start and end points, you will be prompted once you close the dialog. Check the Status bar.
Use the Keep Hoop Position toggle if you want to position the design anywhere within the hoop. You might do this to set up continuous designs or special placements such as on pockets. The Keep Hoop Position toggle will automatically activate ‘Start position’ in the Auto Start and End dialog and set it to ‘Start needle position in hoop’.
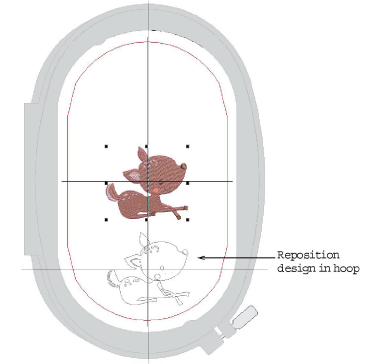
Changing the settings in the dialog will override the toggle. You will need to reactivate it to ensure the design is saved in the correct relative position so the machine can place it properly.