Create manual multi-hoopings

AddHoop.png 

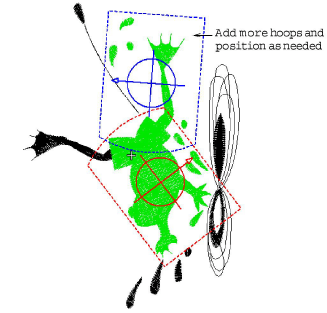
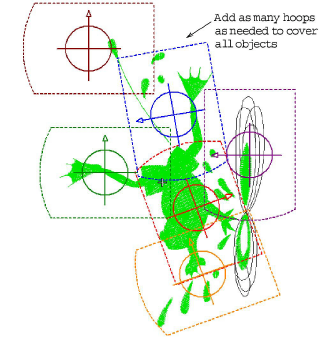
Use Multi-Hooping > Add Hoop to add a new hooping to a multi-hooping layout.

DeleteHoop.png 

Use Multi-Hooping > Delete Hoop to remove selected hoop from hooping layout.

AddHoopRight.png 

Use Multi-Hooping > Add Hoop Left/Right to place a new hooping to left or right of the selected hoop. A 10mm overlap is allowed between sewing fields.

AddFourAdjacentHoops.png 

Use Multi-Hooping > Add N Hoops Around to generate 4/8 hoopings around a selected hoop. A 10mm overlap is allowed between sewing fields.

AddEightHoopsAround.png 

AddSplitingLine.png 

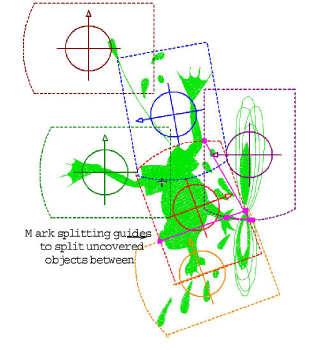
Use Multi-Hooping > Add Splitting Line to digitize one or more guides in a multi-hoop layout to split objects between hoopings.

CalculateHoopings.png 

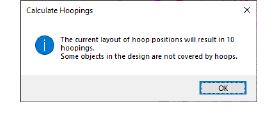
Use Multi-Hooping > Calculate Hoopings to calculate hoopings resulting from current layout.

BERNINA V9 provides a dedicated set of tools which for creating multiple hoopings manually. Use these if you cannot achieve the result you want with the automatic method.

To create manual multiple hoopings...

Since a given stitchout can use only one size of hoop, you need to choose a hoop that will cover the largest object in the design.

MultiHoopManual1.png


MultiHoopManual2.png


TransformToolbarRotateHoop.png


MultiHoopManual3.png


As soon as a hoop is moved or joined by others, automatic centering is deactivated, meaning that it no longer centers itself automatically around objects in the design. If you remove all hoops in a design and create a new one, automatic centering is re-activated.

MultiHoopManual4.png


While a design may be entirely covered by separate hoop positions, some objects may remain uncovered. The confirmation message will tell you and uncovered objects will appear in black.

CalculateHoopingsNotCovered.png


MultiHoopManual5.png


hooping00069.png


Print a copy of the design showing the hoop positions to help you stitch it in the correct hooping order.

Related topics...