Add manual reference markers
Reference markers are sometimes needed for continuous embroidery and possibly work-piece layouts. BERNINA V9 includes two types of reference marker:
You can select and manually place reference markers in a design at any angle and position. The process for using each in a single hoop design is outlined below.
Usage tips...
-
Stitch reference marks first to help align a fabric in the hoop.
-
Sequence them to the start of the design.
-
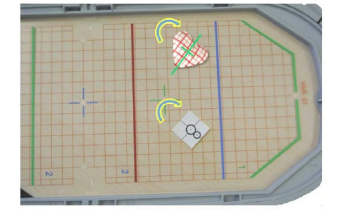
Attach physical adhesive stickers to the fabric to indicate hoop location and orientation.
-
Use basting stitch reference markers to match these stickers.
Note For multi-hooped designs, registration marks are automatically generated when turned on.
To add basting stitch markers...
1Use the Basting Stitch Marker tool to insert the basting stitch marker and place it before the embroidery design so it stitches first. Various sizes and shapes are available.
2Insert the design. Group if not already grouped.
3Select it together with the basting stitch and align the centers.
4Group the basting stitch with the embroidery.
5Position and rotate as needed in the design.
6Print the design layout template and use a physical position marker sticker at the same location and orientation as the basting stitch marker
7Send the design to machine. The basting stitch marker will stitch first.
8Move the start needle position to the center of the sticker on the work piece.
9Start stitching the basting stitch marker to confirm the location and orientation. Adjust as needed.
10Stitch the design.
If you want to manually create a multi-hoop design or continuous embroidery design with a single design, optionally insert basting stitch markers or bitmap markers at the end of the design.
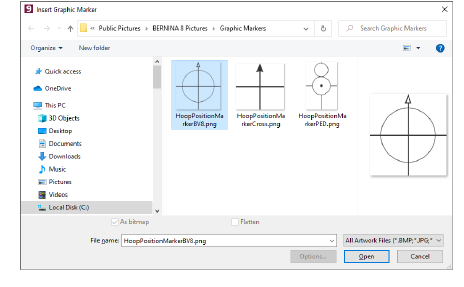
To add graphic reference markers...
1Group the embroidery design if not already grouped.
2Use the Insert Graphic Marker tool to insert markers.
3Select both and use align centers.
4Group the graphic and the embroidery.
5Position and rotate as needed in the design.
6Print the graphic with the design in Print Options.
7Print the design layout template and use a physical position marker sticker at the same location and orientation as the position marker graphic.
8Send the design to machine.
9Move the start needle position to the center of the physical sticker.
10Stitch the design.
Related topics...