
Use Multi-Hooping > Multi-Hooping Options to check your hooping settings.

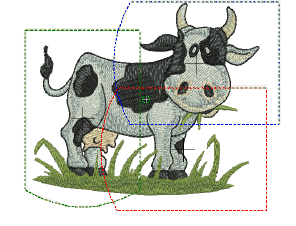
Use Multi-Hooping > Preview Hoopings to preview hoop positions in the Hooping Sequence docker.
|
|
Use Multi-Hooping > Multi-Hooping Options to check your hooping settings. |
|
|
Use Multi-Hooping > Preview Hoopings to preview hoop positions in the Hooping Sequence docker. |
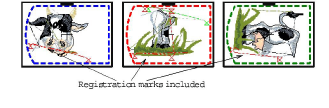
In order to correctly align consecutive hoopings during stitchout, you can include registration marks for each hooping. Two sets of marks are generated in overlapping areas of each consecutive hooping. One set appears as the final stitches of the preceding hooping. The next set is included as the first of the subsequent hooping. These stitches do not form part of the design and are not saved with the design file. However, they are added during output and are viewable in the hooping preview and worksheet.
Tip Correct alignment of multi-hooped designs requires some practice. Third-party training programs are available on the internet which demonstrate correct technique. Most recommend using a sticky-back tear-away stabilizer, heavy enough so that the registration marks do not tear the stabilizer. Use pins through the registration marks of one hooping to align the corresponding marks of the next hooping.
Open or create the large design or design layout you want to sew out.
Click the Options icon and select the Multi-Hooping tab.
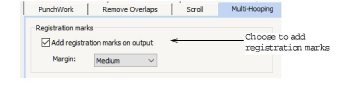
Choose the Add registration marks on output option.
Adjust the margin settings as required.
The larger the margin, the greater the distance between the registration mark and the maximum embroidery area of the hoop. This makes it easier to align but there may be some trade-off in precision.
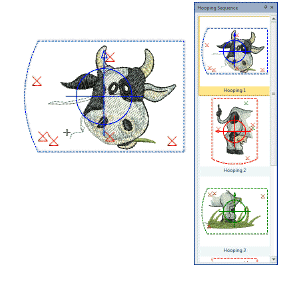
Use the Preview Hoopings tool to check that registration marks have been added. Click and hold to isolate the hooping in the workspace. Red marks indicate the end of a hooping, green, the start of the next.
Registration marks are also shown in the hooping list in Print Preview.
As registration marks are not a permanent part of the design, they cannot be moved. By adjusting hoop positions and using Calculate Hoopings, you can vary where registration marks are placed in overlapping hoop positions.
During production, align the last-stitched registration marks with the marks on the stabilizer, and smooth the fabric onto the sticky back. To assist, stick sewing pins through the center of the registration marks.
Always try to place hoopings as near as possible to the actual object sequence.