
|
|
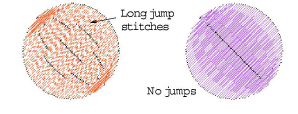
Embroidery machines have a maximum possible stitch length which is determined by the frame movement limitations of the machine itself. If a stitch exceeds this, it is broken into smaller stitches. This can affect the embroidery appearance, especially in Satin fills. By applying Auto Jump, you can preserve long stitches in an object by turning them into a series of jumps.

To create a narrow column with more ‘loft’ than normal Satin, apply Auto Jump, in conjunction with a suitable underlay, with the maximum stitch length set to a small value, e.g. 6 mm. If the cover stitches are short, splitting them with a jump makes them looser and thus more effectively raised off the fabric.
Auto Jump can also be used, for example, with manually digitized underlays. It can even be used to create quilted effects, for example, by applying it to Satin areas that are over-stitched with Run stitch or Pattern Fill. Auto Jump is stored as an object property and is activated by default. You can change its values at any time for selected or newly created objects. Auto Jump values can be adjusted for Fill stitch, Outline Satin and Outline Blanket stitch.
1Select an object or objects to adjust their particular settings.
2Click the Effects icon and select the Others tab.
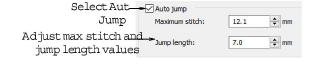
3Select Auto Jump if not already selected and click Apply.
4In the Maximum Stitch field, adjust the maximum stitch length as required. Stitches exceeding this value will have Auto Jump applied.
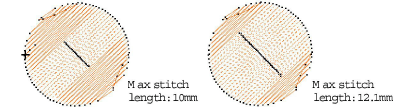
Set the maximum stitch larger than the longest Satin fill stitch you want to allow in the design, otherwise some Satin stitches will be split into two or more stitches.
5In the Jump Length field, enter the length of each jump.
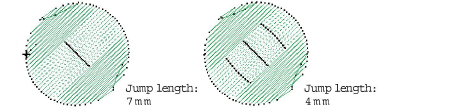
Smaller jumps increase the time required to stitch out but move the frame more smoothly across the design.
6Click Apply. New or selected objects use the adjusted settings.
Click Save To Template before closing this dialog to save settings permanently. Saved settings will be applied to all new designs based on the current template.