Use Effects > Underlay to strengthen and stabilize objects with underlay stitching.

Use General > Effects to apply stitch effects to selected embroidery objects or preset with nothing selected.
|
|
Use Effects > Underlay to strengthen and stabilize objects with underlay stitching. |
|
|
Use General > Effects to apply stitch effects to selected embroidery objects or preset with nothing selected. |
The Underlay tool generates underlay stitching for objects based on current settings. You can preset custom underlay settings for all newly created objects in your design, or apply them to selected objects.
Click the Underlay icon to activate the feature.
To preset underlay settings, click the Effects icon to access the Effects > Underlay dialog.
Create a closed-object – circle or square. The object is digitized using current settings.
To change underlay settings, select the object and right-click the Underlay icon.
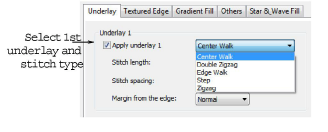
The Effects > Underlay dialog opens. This tab gives you the option of a single underlay or combined first and second underlays.

Select Apply Underlay 1 and select an underlay type from the droplist.
The type of underlay you choose is determined by the purpose it is to serve.

Adjust stitch length and margin settings as required. See below for details. All underlay types available for Underlay 1 are also available for Underlay 2.

For extra stability, select a second underlay. Any combination of underlay types can be used.

To keep a permanent record of your custom settings, click Save to Template.