 o
o
Use General > Object Properties to adjust tie-in/off settings.
|
|
Use General > Object Properties to adjust tie-in/off settings. |
By default, tie-in stitches are inserted at the start of objects to prevent stitches from unraveling. There are instances, however, where whole designs may not include tie-ins, or where selected objects, such as lettering, may not include them. BERNINA V9 gives you control over connector settings.
1Access the connector settings in one of the following ways:
To adjust current settings, click the Object Properties icon or select Settings > Object Properties.
To adjust a particular object or objects, including lettering, double-click or right-click the object(s) to access object properties.
2Select the Connectors tab. This dialog lets you choose how to apply automatic trims, or whether to turn them off altogether.

3Choose a connector method:
|
Method |
Purpose |
|
Trim if... |
Use this option to trigger automatic trims where connectors between objects exceed the specified length (default, 2mm). When selected, tie-offs and tie-ins are automatically activated to prevent stitches from unraveling. Designs created in previous versions of BERNINA V9 or other application may have connector length settings that differ from the default. |
|
Always trim |
Choose this option to trim connectors for selected objects or the entire design. When activated, a tie-in and tie-off is inserted between selected objects, regardless of connector length. Use this option to force trims within lettering objects. |
|
Never trim |
Choose this option to turn off automatic connectors for selected objects or the entire design. This may be necessary for specialized purposes such as ‘reverse embroidery’ which involves using thick threads in the bobbin. There can be no tie-offs for this. You may want to make embroidery with creative threads where tie-offs can’t be used. In these cases, you can turn off tie-ins and/or tie-offs and keep threads from unraveling by cutting them long and pulling them through. |
When ‘always trims’ or ‘never trim’ are selected, tie-offs and tie-ins are automatically activated to prevent stitches from unraveling.
4The dialog contains two panels – Tie-off after object and Tie-in before object. If you have chosen to use automatic trims, these allow you selective control over ‘tie-off’ stitching (after objects) and ‘tie-in’ stitching (before objects).
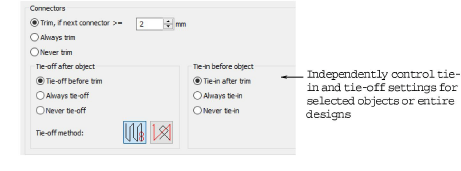
5Adjust the Tie-in before object setting as preferred:
When activated, tie-ins may be inserted if the connecting stitch before an object is greater than the specified amount (2mm default).
For added stability, at the expense of increased bulk, choose to always tie-in, whether or not trims are used.
When turned off, no tie-in is inserted for either external or internal connectors – e.g. within lettering objects.
Selectively adjust Tie-off after object settings in the same way, for selected objects or the entire design.
If you have chosen to tie-off after objects, select a preferred method.

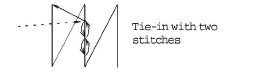
The first method inserts tie-off stitches along the last stitch.
The second inserts tie-off stitches between the last two stitches.
The first method is better suited to non-lettering objects while the second method is better for lettering objects.
Click Apply. Settings are applied to selected objects or, if no objects are selected, current properties.