
Use Effects > Star Fill to create radial turning stitching with available stitch types.

Click Transform > Reshape Object to view the reshape nodes of a selected object.
|
|
Use Effects > Star Fill to create radial turning stitching with available stitch types. |
|
|
Click Transform > Reshape Object to view the reshape nodes of a selected object. |
 Star Fill generates radial turning stitching in several stitch types such as Satin and Step stitch. Stitches are generated from the outside edge to the geometric center. The center can be shifted.
Star Fill is applicable to several object shapes – closed, circle and rectangle – with optional holes. The effect may be on or off while digitizing. All transformations, excepting morphing effects, preserve the Star Fill radial stitching but transform the hole shape. Shaping operations such as Mirror Merge or Remove Overlaps preserve Star Fill effect.
Tip For best effect, use Star Fill with ring shapes. The size of ring should be about 20% of the outer diameter.
1Select a closed-object and click the Star Fill icon. The effect is applied to the selected object.
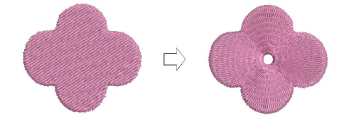
2To modify the effect, select the object and click the Reshape Object icon. In Reshape mode, you can:
Move the center point of the radial stitching.
Set the size of the center hole.
Edit the center hole shape as for a circle/ellipse object.
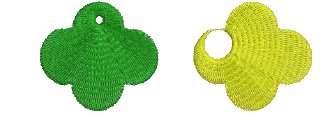
Unlike Ripple stitch, the center of Star Fill effect can be moved outside the shape or into an included hole to achieve a different effect, without loosing the original shape.
3Press Enter to apply, Esc to finish.
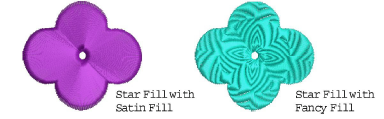
Star Fill can be applied together with Satin Fill, Step Fill, and Fancy Fill.
You are not able to directly edit the stitch angles automatically generated by Star Fill effect. However, you can apply Break Apart to an object with Star Fill effect and edit the resulting turning angle closed object.
Not all patterns and stitch settings or objects (size specific) are suitable for Star Fill. In particular, if you are using it with larger objects, use one or a combination of the following to avoid bunching at the center:
Increase the size of the hole, move the center into an existing hole in the object, or move it outside the object altogether.
Add Textured Edge to the inside.
Use larger stitch spacing – increase by about 20%.
Avoid patterns which add needle penetrations close to the center of the object.
Use Edge Walk underlay with smaller objects, to help reduce the number of stitches at the object center.
For fewer problems and a better embroidery result, use an SUK or H/E embroidery needle.