Create stumpwork with a wireline
Digitizing with wire and fabric is probably the commonest scenario for creating stumpwork. This involves digitizing a simple cutwork piece and turning it into a stumpwork sub-design. This is then sewn onto a separate piece of fabric, often patterned, with the inclusion of a wire, and then cut out and attached to the base design. Required tools are listed above.
To digitize stumpwork with a wireline...
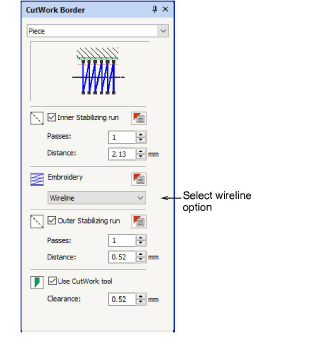
1Open the CutWork Border docker and preset your preferences. Choose ‘Wireline’ as your embroidery type. See Cutwork concepts for details.
2Select the Digitize Piece tool and make sure Wireline is selected as your embroidery type.
3Open the object properties to adjust your wireline gauge and cover stitch settings.
If you choose Wireline as your embroidery type, the following properties can be set:
|
Setting
|
Notes
|
|
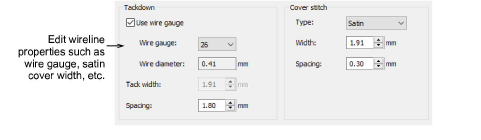
Tackdown
|
The gauge of wireline you are using determines the width of guidetrack and tackdown stitching. You can choose to factor it into your cutwork properties or use the default value.
|
|
Wire gauge
|
The wire gauge numbers correspond to the American Wire Gauge (AWG) codes. This is a standardized wire gauge system for the diameters of round, solid, nonferrous, electrically conducting wire. The larger the AWG number or wire gauge, the smaller the physical size of the wire.
|
|
Cover stitch
|
Satin is the default. Alternatively, Blanket can be used. Width and spacing can be adjusted for both.
|
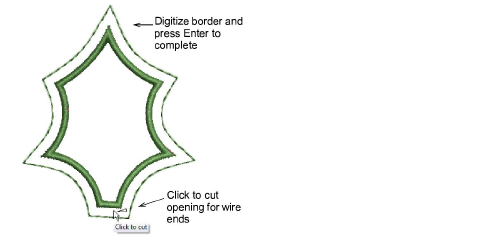
4Digitize your border as you would any other closed object.
5Press Enter to complete. A stumpwork object is generated based on the CutWork Border presets. If you have choosen Wireline, you are prompted to mark a cutting point.
6Alternatively, use the Cut Closed Border tool after the fact, to cut the border and leave an opening for wire ends.
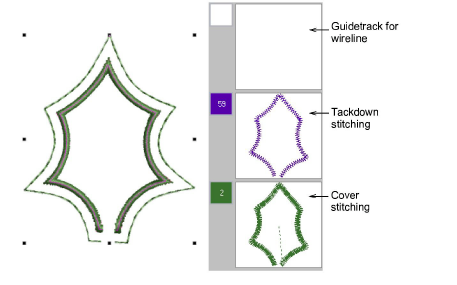
7Optionally, use the Digitize Wireline tool to insert additional wirelines for extra support. See Digitize additional wirelines for details.
8Select the objects and click Create Stumpwork Sub-design.
Selected objects are bundled into a composite object which resides on a separate ‘layer’ to the base design. The stumpwork layer does not appear in the Color Film because it is separate to the main design.
9Optionally, edit your stumpwork sub-design by double-clicking or clicking Open Stumpwork Sub-design.
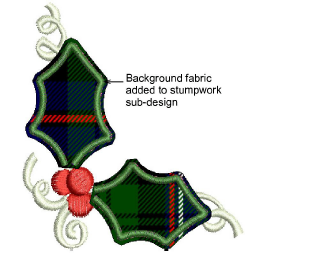
The stumpwork sub-design opens in a separate window where you can edit properties such as wire gauge, satin cover width and offsets, etc. Optionally, add a background indicative of the fabric you will be using. See Edit stumpwork sub-design for details.
Study the Stumpwork_Sample1 design included in the designs folder. Try stitching it out to practice the techniques involved. Check your BERNINA machine documentation.