Use General > Options to configure workspace options such as grid, hoop, and scroll settings.
|
|
Use General > Options to configure workspace options such as grid, hoop, and scroll settings. |
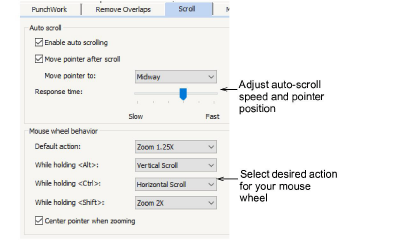
The Scrolling tab allows you to control the behavior of both mouse and mouse wheel within BERNINA V9. Use Auto Scroll to scroll automatically within the workspace while digitizing. This can be more convenient than using panning or scroll bars, especially when working on large designs. The dialog also allows you to set four different mouse wheel behaviors. That is, you can program the wheel to scroll horizontally, vertically, or zoom by preset factors.
1Click Options icon and select the Scrolling tab.

2Tick the checkbox to enable automatic scrolling while digitizing.
3Adjust settings as preferred:
|
Option |
Purpose |
|
Move pointer after scroll |
Tick checkbox to force pointer to move with the current cursor position after each scroll. |
|
Response time |
Enter smaller values to increase scrolling speed. |
The effect of the Auto Scroll setting only becomes apparent when you start to digitize. The workspace automatically scrolls to follow the current cursor position.
4Select the pointer position after scrolling from the Move Input Point To list:
|
Option |
Purpose |
|
Center |
Center of the window. Use this setting for large movements. |
|
Midway |
Halfway between the original pointer position and the center of the window. Use this setting for smaller movements – e.g. when zooming into a small area of the design. |
|
Corner |
The edge of the screen. Use this setting for slow scrolling. |
5Set the precise behavior of your mouse wheel action as desired. The same four options are available for use when deploying the mouse wheel on its own or in combination with Alt, Ctrl, and Shift keystrokes.
6Tick Center Pointer when Zooming to ensure that the pointer stays centered on screen at all times.
7Click OK.
Hold down the Shift key to temporarily deactivate Auto Scroll. Use the Ctrl+Shift+A key combination to quickly toggle Auto Scroll on/off.