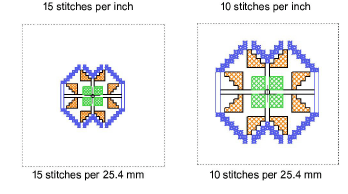
You set cross stitch design size by adjusting the ‘fabric count’. This actually changes the scale of your finished design. The more stitches per inch, for example, the smaller and more compact the resulting design.
Caution A common problem with cross stitch designs is that they ‘pull’, especially with smaller, closely packed stitches. Cross stitch designs tend to pull in a uniform way with gaps usually forming in straight lines. Sometimes holes appear giving the impression of missing stitches.
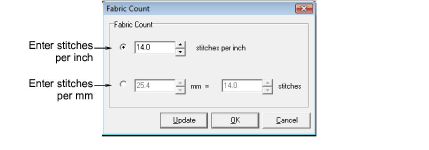
1Select Settings > Fabric Count. The Fabric Count dialog opens.
2Select a fabric count option, inches or millimeters:
Number of stitches per inch: The fewer stitches per inch, the bigger the resulting design.
Number of millimeters per number of stitches: Because a cross stitch is bigger than a millimeter, you can adjust the mm and stitch settings in relation to each other. The higher the mm value, or smaller the stitch value, the bigger the design.
By clicking Update, you get an immediate conversion of any values you have entered. For example, change the stitches per inch value, click Update, and the corresponding stitches per mm value will be updated.
3Click OK.