Designs containing open objects cannot be handled by the Digitize Appliqué tools.
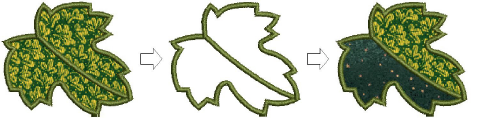
In this design, the stem in the center of the leaf must be sewn after the placement and cutting lines around the leaf outline but before the cover stitches. There may be one or two fabric areas. If there is only one patch, the stem will not require placement or tacking stitches. If there are two patches, the stem, as well as the outline, must have placement and tacking stitches.
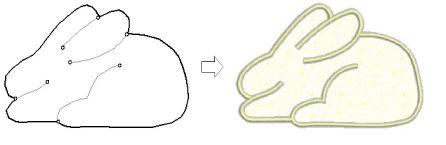
Another problem is illustrated by the rabbit design below. The entire shape is composed of open curves whose stitching order is crucial – e.g. the left ear must be on top. The interior of the rabbit needs to be filled with fabric, even though none of its component curves is closed.
In both cases, you want to be able to enter the curves in as natural an order as possible and have the software correctly interpret where the enclosed areas are to be. To this end the special Advanced Appliqué tool allows you to generate ‘open-object appliqué’ from one or more source or ‘primary’ objects. Boundaries can be defined by a mixture of objects as shown here:
Source or ‘primary’ objects used in the creation of open-object appliqué must be created and sequenced before the feature is applied. These objects are not affected in any way by their incorporation into open-object appliqué. Several types of source object can be used:
Any outline stitch type – Single Run, Satin Outline, etc,
Any closed-object filled object, or
Any block-digitized object.
Some other object types can be used as input in combination with the above objects. These include lettering objects, auto-appliqués and even other open-object appliqués.
Note If BERNINA V9 detects more than one area, you have the option of joining them into one patch.
Up to three types of ‘secondary object’ can be automatically generated:
|
Layer |
Use |
|
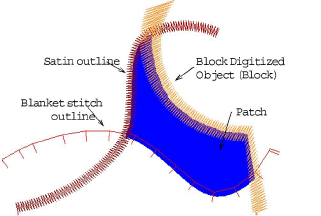
Placement line |
This is the first appliqué layer to be stitched. Placement lines are used to position precut patches on a background material. This assumes that the appliqué shape will be cut out on an appliqué cutter or by some other means. |
|
Cutting line |
This forms a guide when trimming the fabric of an appliqué patch ‘in situ’. The cutting line holds the fabric in place and provides a cutting guide. |
|
Tackdown |
This is the stitch layer used to fix appliqué patches to background fabric before cover stitching is applied. You have a choice of tackdown types including Blanket, Zigzag, etc |
Each ‘boundary segment’ will generate a placement line, cutting line and/or tackdown depending on current settings.
Note Secondary objects are stitched before primary objects and are therefore shown beneath. You can assign thread colors to each secondary object or let BERNINA V9 decide.
|
|
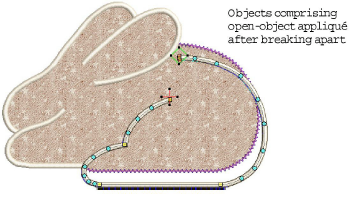
Use Appliqué > Break Apart to split monograms, appliqué, lettering, and blackwork runs into component objects for editing. |
Open-object appliqué objects can be selected and manipulated in the same way as a grouped object – i.e. they can be moved, resized, skewed or rotated, using the same click and drag method applying to all objects. Reshaping of open-object appliqué objects, however, is not possible. Nor is there any way to select individual objects, primary or secondary, within open-object appliqué unless the object is first ‘broken apart’. Alternatively, use Advanced Appliqué to recover the original embroidery objects.