If your design is too large or involves a large work area, you have the option of splitting it into multiple hoopings. The Multi-Hooping toolbox lets you strategically position hoops until you obtain the least number of hoopings necessary to accommodate the whole design layout.
Each hooping contains an object or group of objects that can be stitched out on their own. Hoopings are stitched consecutively to form the whole design. They can be sent directly to machine or saved to file.
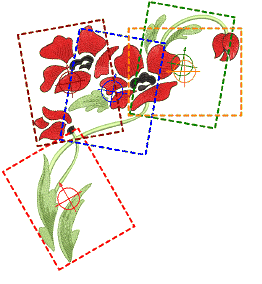
1Create a large design combining many design elements.
2Add hoops via Multi-Hooping to cover each design element in the layout. You can use the automatic feature to generate hoopings even in large layouts.
3Optionally, include a background for the garment you are using.
4Print out the layout template from the software. Large layouts can be printed on small format printers and then pieced together. This establishes all hoops in the correct spatial relationship.
5Fix the template to the garment. Remove the unnecessary pieces of the layout to isolate the individual hoopings.
6Hoop the fabric (or garment) and stitch out the first hooping. Registration marks are stitched last. Use the hoop position marker to locate and rotate the garment using the physical hoop template.
7Un-hoop the fabric.
8Hoop a piece of sticky backed stabilizer and remove the protective paper.
9Stitch the registration marks at the start of the next hooping onto the stabilizer.
10Align the last-stitched registration marks with the marks on the stabilizer, and smooth the fabric onto the sticky back. To assist, stick sewing pins through the center of the registration marks.
11Stitch the next hooping.
12Repeat until the design is complete.