Use Edit > Outlines & Offsets to create outlines and offsets of any type for any embroidery object, open or closed.
|
|
Use Edit > Outlines & Offsets to create outlines and offsets of any type for any embroidery object, open or closed. |
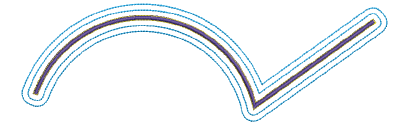
BERNINA V9 provides tools for quickly generating new outlines and offset objects based on existing objects. Use the Outlines & Offsets tool to highlight details – e.g. small satin objects – or create seamless borders. Auto-outline designs in any outline stitch. Any shape can be used, open or closed.

1Select the embroidery object/s or design to outline.

2Select the Outlines & Offsets tool. The Outlines & Offsets dialog opens.
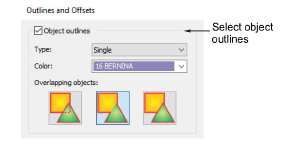
3Tick Object Outlines and choose an outline type. The Type droplist includes the full range – Single Run, Triple Run, etc.
4Choose your outline color. The Color droplist defaults to the current color in the color palette.
5Choose an option for handling overlapping objects:
|
Outline type |
Notes |
|
|
|
Individual |
All generated outlines are full outlines. |
|
|
Common |
Intersecting outlines are combined into a single outline. |
|
|
Trimmed |
Overlapped portions are trimmed by the overlapping objects. |
6Click OK to apply. The software generates an outline around the source object/s and inserts them immediately afterwards in the stitching sequence.

Generated outlines are independent objects and can be further modified as desired. Change colors, stitch types, and settings as desired.

1Select the source object/s if not already selected.
2Tick Offset Outlines.
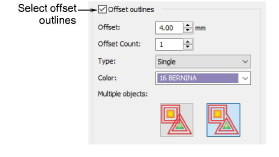
3Select an outline color and stitch type.
4In the Offset Counts field, enter the number of offsets required and an offset amount.
5Choose an option for handling multiple objects:
|
Offset type |
Notes |
|
|
|
Individual |
All generated offsets are full outlines. |
|
|
Common |
Intersecting offsets are combined into a single outline. |
6Choose an option for handling sharp corners:
|
Corner type |
Notes |
|
|
|
Round |
Sharp corners are always rounded. |
|
|
Sharp |
Sharp corners are preserved. |
|
|
Cut |
If the inside angle is 20° or less, the corners are cut. |
7Optionally, tick Include Holes if the object includes holes which you also want outlined.

8Click OK to apply. The software generates offset objects and adds them to the end of the stitching sequence.

Optionally, combine offsets with outlines for added emphasis.

Outlines & Offsets can be applied to open objects as well as closed.