Digitizing tools
Different digitizing methods or ‘tools’ are suited to creating different shapes or design elements. Digitizing methods divide broadly into two categories – outline and fill. Like drawing objects, embroidery objects have certain defining characteristics or ‘properties’ such as color, size, position, and so on. They also have properties unique to embroidery such as stitch type and density. The most important property for an embroidery object is its stitch type. Different stitch types are suited to different shapes.
Select digitizing tools
Digitizing methods divide broadly into two categories – outline and fill. BERNINA V9 provides various tools with which to digitize shapes – Open Object, Closed Object, Block, Ellipse, and Rectangle. The Open Object tool is used to create outline shapes. The Block Digitizing tool is used to create columns of varying width and stitch angle. The Closed Object, Ellipse, and Rectangle tools are used to create filled or outlined shapes.
Reference points & reshape nodes
Once you have selected a digitizing tool, you digitize shapes by marking ‘reference points’ along an outline using the following conventions:
In general, you mark a reference point where:
The reference points you mark when digitizing become ‘reshape nodes’ during reshaping operations. Other control points associated with objects allow you to transform objects (rotate, skew, etc), scale (resize), adjust letter spacing, and change entry and exit points.
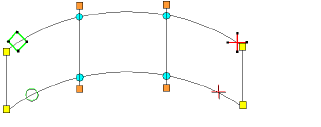
Reshape nodes are color-coded, corner points appearing as yellow squares, curve points as turquoise circles, and stitch angle points as orange squares. Object entry points are shown as green diamonds, exit points as red crosses. The start and end points of an entire design are indicated by a small green circle and small red cross respectively.
Note Most reshape nodes can be added, deleted, moved or changed to either corner or curve points. Some reshape nodes have a specific function and cannot be deleted – for example, the entry point marker.
Join methods
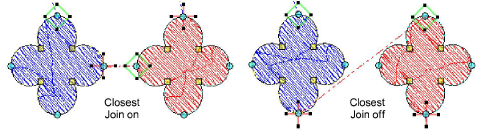
The Closest Join setting automatically calculates the closest join between objects while digitizing saving you having to think about entry and exit points. When activated (the default), all newly digitized objects are joined by this method. When deactivated, all newly digitized objects are joined by the As Digitized method. This means they are joined from the exit point of the last digitized object to the entry point of the new object. When Closest Join is off, you are able to specify entry and exit points when digitizing closed objects.
Object properties
Object properties are defined as you digitize, but they can be changed at any stage. When you create an embroidery object, you can accept the default settings for the particular digitizing method, or apply new ones. Default settings are stored in the design template. You can also define ‘current’ properties to influence all the objects you create in the current design.
Related topics...